Building Your Own Wooden Boat at Home: A Beginner's Guide
Hey there, fellow boat enthusiast! Always dreamt of owning a boat, but the prices seem a bit… daunting? Well, what if I told you you could build your own? It might sound crazy, but building a small wooden boat at home is entirely achievable, even for a beginner with some basic woodworking skills and a whole lot of patience. This guide will walk you through the process, making it as straightforward as possible.
Choosing Your Design: Simple is Key
Let's be realistic. Your first boat-building project shouldn't be a 40-foot schooner! Start small and simple. There are tons of free plans online for simple designs like:
- Small rowing boats (dinghies): These are perfect for learning the ropes and require less material and time.
- Kayaks: A bit more challenging, but still manageable for a beginner with clear instructions.
- Small canoes: Similar to kayaks in complexity.
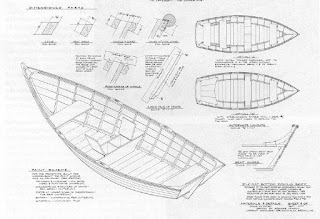
Search online for "free wooden boat plans for beginners" – you'll find a plethora of options. Make sure the plans are detailed and include diagrams, material lists, and clear instructions. Don't be afraid to choose a design that seems a little intimidating at first; taking it slow and steady will get you there.
Gathering Your Materials: The Heart of the Project
Once you've selected your plans, it's time to gather your materials. This is crucial, so take your time and double-check everything against your plans.

The Wood: Choosing the Right Stuff
The type of wood you choose significantly impacts the boat's durability and weight. Cedar and pine are popular choices for beginners due to their relative ease of working with and resistance to rot. However, you might find other readily available, affordable woods that work equally well. Always check the wood for knots, cracks, and warping – you want pieces that are as straight and consistent as possible.
Other Essential Materials:
- Marine-grade plywood: Essential for the bottom and potentially other parts of your boat depending on the design.
- Wood glue: Choose a high-quality waterproof wood glue.
- Screws: Galvanized or stainless steel screws are necessary to prevent rust.
- Epoxy resin and hardener: For sealing and strengthening the joints, this is a crucial step for waterproofing.
- Fiberglass cloth (optional): Adding fiberglass will increase the boat's strength and durability, but it adds to the complexity.
- Sandpaper (various grits): For smoothing out surfaces and preparing for paint.
- Paint or varnish: Choose a marine-grade paint or varnish designed to withstand exposure to water.
- Clamps: You'll need plenty of clamps to hold the pieces together while the glue dries.
- Safety equipment: Eye protection, dust mask, and gloves are a must!
Building Your Boat: Step-by-Step
This is where the real fun (and work!) begins. The specific steps will depend on your chosen boat design, but here's a general overview:
1. Preparation is Key
Carefully review your plans multiple times before you start cutting. Understand each step and double-check your measurements. Accurate cutting is paramount to building a structurally sound boat.
2. Cutting and Shaping
Use the appropriate tools for cutting your wood. A hand saw, jigsaw, or circular saw (with proper safety precautions!) can all work, depending on the thickness of the wood and the design's complexity.
3. Assembling the Hull
This is typically the most challenging part. Carefully follow your plans, using glue and screws (or other fasteners as specified in your plans) to join the pieces of the hull together. Use clamps to hold everything in place while the glue dries. Allow ample drying time – rushing this step will compromise your boat's structural integrity.
4. Adding the Deck (if applicable)
If your boat design includes a deck, this will need to be carefully attached to the hull, ensuring a watertight seal. Again, use plenty of glue and appropriate fasteners.
5. Finishing Touches
Once the hull and deck are securely attached, it's time for the finishing touches. This includes sanding down any rough edges, filling any gaps with epoxy putty, and applying several coats of marine-grade paint or varnish.
Launching Your Creation!
After all that hard work, the moment of truth arrives! Carefully lower your boat into the water. Inspect for any leaks and make any necessary adjustments. Enjoy the fruits of your labor and the thrill of sailing (or rowing or paddling!) your self-built boat!
Commonly Asked Questions
Q: How long does it take to build a wooden boat?
A: This varies greatly depending on the size and complexity of the boat, as well as your experience level. A simple dinghy might take a few weeks, while a more complex kayak or canoe could take several months.
Q: Do I need any special tools?
A: Some basic woodworking tools are essential, like saws, clamps, measuring tools, and sandpaper. More specialized tools might be needed depending on your boat design, but many designs can be built with just basic hand tools.
Q: How much does it cost to build a wooden boat?
A: The cost varies significantly depending on the size, materials, and complexity of the boat. However, building your own boat is generally much cheaper than buying a similar boat commercially.
Q: Is it difficult for a beginner?
A: Starting with a simple design and following detailed plans will greatly increase your chances of success. Don't be afraid to ask for help from more experienced woodworkers if you encounter difficulties.
Q: How do I ensure the boat is watertight?
A: Careful attention to detail during construction is crucial. Using waterproof glue, properly sealing all joints, and applying several coats of marine-grade paint or varnish are essential for creating a watertight vessel.
Remember, building a wooden boat is a rewarding, albeit challenging, project. Take your time, be patient, and enjoy the process! Happy boat building!


0 comments:
Post a Comment